
If your AC is leaking water, turn it off. Most indoor leaks come from a clogged condensate drain, a frozen evaporator coil, or a cracked drain pan, and running the system while water pools near electrical parts risks both damage and shock hazard. Cut power at the thermostat and breaker, contain the water with towels, then check the air filter and look for ice on the coils before you do anything else.
TL;DR:
- Most leaks stem from clogged drain lines, frozen coils, or damaged drain pans, which account for about 70% of indoor AC water leak calls.
- Immediate action involves shutting off power, containing water, examining the filter, and checking for ice or blockages within the first ten minutes.
- Homeowners can attempt DIY fixes such as replacing filters, clearing drain lines with a vacuum or vinegar, or thawing frozen coils, but must avoid forcing defrost or handling refrigerant themselves.
- Professional service is necessary if leaks persist after basic troubleshooting, or if symptoms include refrigerant smells, frequent refreezing, or water pooling near electrical components.
- Regular maintenance like monthly filter checks, drain flushing, and annual tune-ups can prevent most leaks and related mold or water damage issues.
Table of Contents
- Why Is Your AC Leaking Water? The Most Common Causes
- Immediate Triage: What to Do in the First Ten Minutes
- DIY Fixes You Can Safely Try First
- When to Call a Professional HVAC Technician
- Preventing the Next Leak Before It Starts
- Beyond the Puddle: Water Damage and Air Quality Risks
- Author’s Take: What Homeowners Get Wrong About AC Leaks
- Get a Licensed Technician on the Way, Fast
- Sources
- FAQ
Why Is Your AC Leaking Water? The Most Common Causes
An AC unit produces condensation constantly during cooling season, and that water has exactly one job: travel down a drain line to the outside. When something blocks that path or freezes the coil that creates the condensation, water backs up and finds the nearest exit, which is usually your ceiling, wall, or floor.
Clogged condensate drain line. Algae, dust, and mildew build up inside the drain over months of moist, dark conditions, eventually plugging it like a slow kitchen sink. This single issue is behind roughly 70% of indoor AC water-leak service calls that local contractors handle, and it’s usually the cheapest, fastest fix on this list. Check the outdoor drain exit, typically a white PVC pipe near the condenser, for a slow trickle or no flow at all.
Frozen evaporator coil. Restricted airflow or low refrigerant causes the coil to drop below freezing, and ice forms where condensation should drip away cleanly. Both a dirty filter and a refrigerant leak can trigger this freeze, and when the ice eventually melts, it often melts faster than the drain pan can handle, overflowing onto the floor.
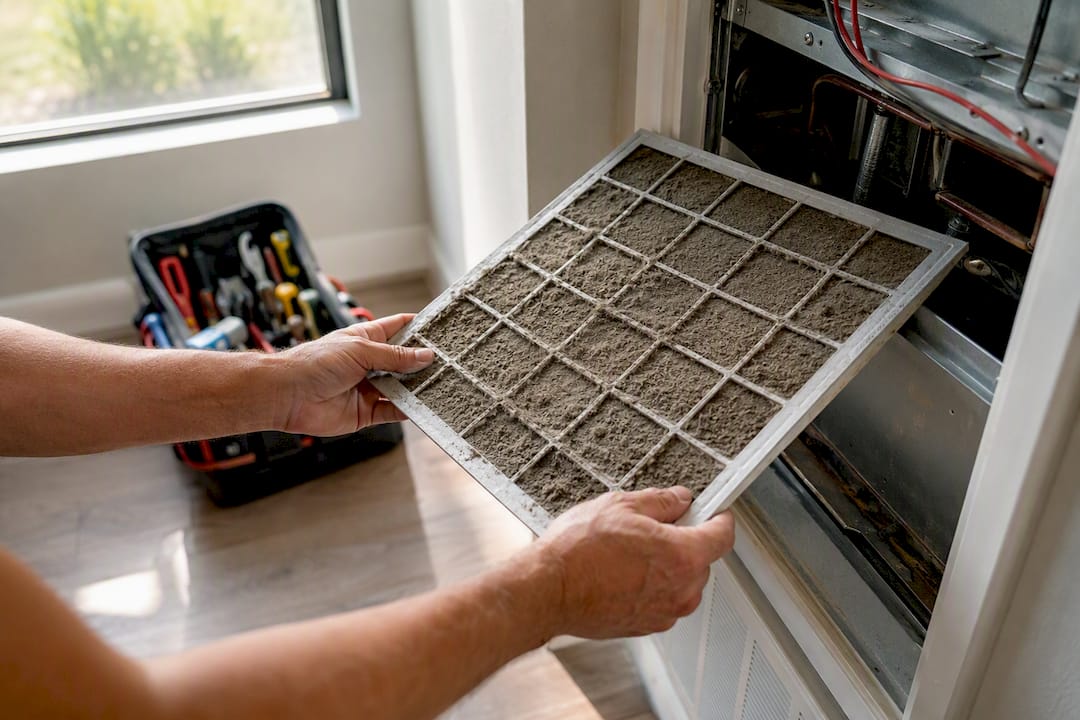
Dirty or blocked air filter. A clogged filter starves the coil of warm airflow, and that’s often the root cause behind the frozen coil above. It’s the easiest thing to check first: pull the filter and hold it up to a light. If you can’t see through it, it’s restricting airflow enough to cause problems.
Damaged or rusted drain pan. Pans corrode over years of sitting in standing water, especially in older units. Once metal pans rust through, they leak no matter how clear the drain line is.
Condensate pump failure or disconnected line. Systems in basements or units without gravity drainage rely on a small pump to push water out. When that pump fails or a line pops loose, water has nowhere to go but down.
Installation pitch and oversized systems. A drain line installed without proper slope, or an AC unit oversized for the space, can create chronic drainage struggles even when everything else works correctly.
Immediate Triage: What to Do in the First Ten Minutes
Acting fast limits damage to floors, drywall, and electrical components. Work through these steps in order:
- Kill the power. Switch the thermostat off, then flip the breaker for the AC system. Don’t touch the unit if water is pooling near an outlet or the electrical panel.
- Protect the area. Lay towels or a bucket under the leak, and unplug nearby electronics if you can reach them safely without stepping in water.
- Check for ice. Open the indoor unit’s access panel if you can do so without tools and look at the coil for visible frost or ice buildup.
- Inspect the filter. Pull it out and check for dust buildup, since a dirty filter is often the fastest clue to what’s happening upstream.
- Trace the water. Note whether it’s coming from the indoor unit, a vent, or a ceiling stain, and check the outdoor drain line exit for obvious clogs or slow drips.
Pro Tip: Take photos of the water stain, the filter, and the coil before you clean anything up. A technician can often narrow down the cause in half the time when they see exactly how the leak looked when it started.
DIY Fixes You Can Safely Try First
Several fixes are within reach for most homeowners, provided you respect the limits below.
- Replace the air filter. Standard filters need replacement every 30 to 90 days depending on usage, pets, and local air quality. This is the single most preventable cause on the list.
- Clear the drain line. Attach a wet/dry vacuum to the outdoor drain exit and run it for two to three minutes to pull the clog out. Alternatively, pour a cup of distilled vinegar into the indoor access point to break down algae buildup, then flush with water an hour later.
- Thaw a frozen coil. Turn the system off completely and run just the fan for two to four hours to let ice melt naturally. Never chip at ice with a tool or point a space heater at the coil. Forcing a thaw can crack the coil housing and turn a simple problem into an expensive one.
- Contain a cracked pan temporarily. A towel or shallow container under a cracked pan buys you time, but pan replacement itself is not a homeowner repair.
Some situations call for stopping immediately and calling a licensed technician:
- Refrigerant smell, hissing sounds, or coils that keep refreezing after a filter change
- A corroded pan built into the unit rather than a removable tray
- A clogged line that runs inside a wall cavity and can’t be reached from either end
- Any sign of electrical fault, sparking, or a tripped breaker that won’t reset
Pro Tip: If you clear the drain line and the same coil freezes again within a week, that’s rarely a coincidence. It usually points to a slow refrigerant leak, which is not something to chase yourself since refrigerant work requires certified handling equipment.
When to Call a Professional HVAC Technician
Some symptoms are simply outside safe DIY territory. Call a tech right away if you notice:
- Water actively pooling near an outlet, panel, or wiring
- Ceiling or wall stains that keep spreading or reappearing after cleanup
- A coil that refreezes repeatedly even after a fresh filter
- Hissing sounds near the indoor unit, which usually signals a refrigerant leak
- Vents blowing warm air even though the system is running constantly
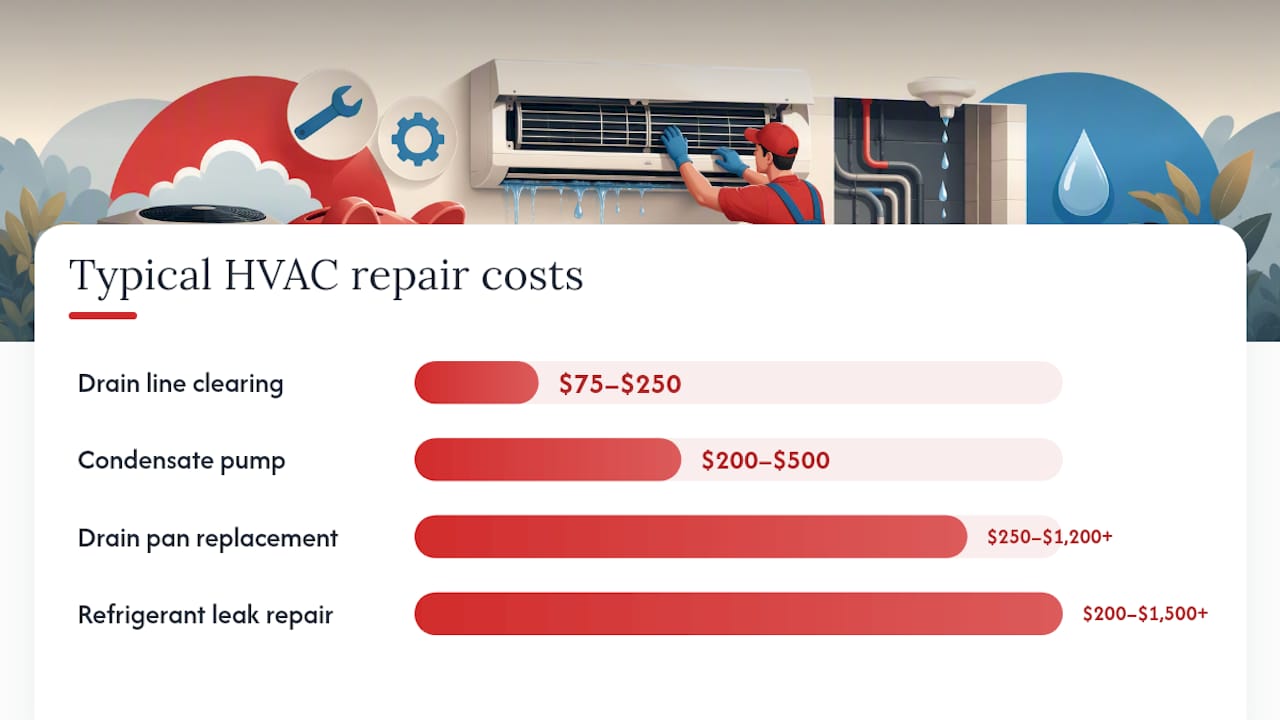
Repair costs vary by the failure, but ranges are fairly predictable. Drain line clearing typically runs $75 to $250 and takes 30 to 60 minutes. A condensate pump replacement lands between $200 and $500. Drain pan replacement runs $250 to $1,200 or more depending on accessibility, and refrigerant leak repairs vary widely, often $200 to $1,500 or higher depending on the leak’s location and the refrigerant type.
When you call, tell the dispatcher exactly where the water appeared, whether the system still cools the space, the date of your last maintenance visit, and whether you noticed ice or hissing. For any refrigerant work, ask specifically for an EPA Section 608 certified technician, and request a written estimate with a warranty on the repair before work begins.
Preventing the Next Leak Before It Starts
A leak you fix once and never think about again is rare. Most AC water problems come back unless you build a few habits into your routine.
- Check the filter monthly during cooling season and replace it every 30 to 90 days depending on usage.
- Flush the condensate drain line two or three times per cooling season, even if nothing seems wrong.
- Schedule an annual spring tune-up that includes coil cleaning, drain inspection, condensate pump testing, and a refrigerant check, since routine professional maintenance catches most of these issues before they become leaks.
- Install a small water sensor under the air handler. They cost little and will alert you the moment water starts pooling, long before a stain shows up on the ceiling.
- If you run a window unit, confirm it tilts slightly toward the outside. A level or inward-pitched unit is one of the most common and easiest-to-fix causes of window AC leaks.
- For mini splits, verify the indoor unit and drain line both maintain a downward slope toward the outdoor exit; a poorly mounted unit will leak no matter how clean the filter is.
Pro Tip: Mark your filter replacement date on your phone’s calendar. It sounds basic, but forgetting this one step is behind more service calls than any mechanical failure in the system.
A seasonal maintenance checklist built around these habits will catch the vast majority of leaks before they start.
Beyond the Puddle: Water Damage and Air Quality Risks
A leak left alone doesn’t just stain your ceiling. Standing water inside walls and under flooring creates the exact conditions mold needs to establish itself, and once mold takes hold behind drywall, it’s a remediation job, not a quick wipe down. Watch for musty odors, discoloration on ceilings or walls near vents, and softened or warped flooring near the indoor unit, all signs water has been sitting longer than a quick cleanup implies.
Indoor air quality suffers too. A unit that’s leaking is often also struggling with airflow, which means it’s circulating less filtered air and, if mold has started growing, potentially spreading spores through the ductwork. Humid climates and swings between hot days and cool nights accelerate both the freezing and the mold risk, which is why leaks tend to cluster in the peak of summer when humidity and system runtime both spike.
Author’s Take: What Homeowners Get Wrong About AC Leaks
Most homeowners either panic and call an emergency tech for a five-minute filter swap, or they ignore ceiling stains for weeks because the AC still seems to cool the room. Both instincts miss the point. A leak is a symptom, not the disease, and the fix almost always lives one step upstream: airflow, drainage, or refrigerant charge.
The conventional advice to “just call someone” undersells how much homeowners can safely handle themselves. Clearing a drain line with a wet/dry vac takes ten minutes and costs nothing. But conventional advice also underplays the danger of the situations where DIY makes things worse, like forcing a coil thaw or ignoring a refrigerant hiss because the unit is still blowing cold air. Prioritize the cheap, safe checks first: filter, ice, drain exit. If those don’t solve it, that’s your signal the problem lives deeper in the system, and that’s exactly where a licensed technician earns their fee.
— Ygal
Get a Licensed Technician on the Way, Fast
Airconditioning-heating connects you directly with licensed, local HVAC contractors instead of leaving you to search review sites and gamble on a random number. If you’ve worked through the checks above and the leak keeps coming back, or you’ve spotted a refrigerant hiss, a corroded pan, or water near your electrical panel, that’s the point to stop troubleshooting and get a professional on site.

The referral process is simple: describe what’s happening, and you get matched with a contractor who handles AC repair in your area, often with same-day availability for active leaks. It’s a better fit than cold-calling companies one by one, especially when water is actively pooling and you need someone qualified today, not next week. Reach out through Airconditioning-heating now to get connected with a licensed technician near you and stop the leak before it reaches your subfloor.
Sources
- Why Is My Air Conditioner Leaking Water & What Should I Do? — Bryant
- Why Is My AC Leaking Water? | Troubleshooting & Repair — Carrier
- How to stop AC water leak — Direct Energy
- AC leaking water troubleshooting — Trane
FAQ
Can I still run my AC if it’s leaking water?
You shouldn’t run it, especially if water is pooling near electrical components or the leak location is unclear. Shutting the system off prevents further water damage and reduces shock risk while you diagnose the cause.
Is a leaking AC unit an emergency?
It depends on the severity. Water near outlets or a panel, or a leak that’s actively spreading, counts as urgent and warrants an emergency repair call, while a slow drip you’ve caught early can typically wait for a scheduled appointment.
What should I do when my AC leaks water?
Turn the system off at the thermostat and breaker, protect the surrounding area with towels, then check the filter and look for ice on the coil before deciding whether it’s a DIY fix or a call to a technician.
Should I turn off my AC if it is leaking?
Yes. Turning it off first limits water damage and gives you time to safely diagnose whether the cause is a clogged drain, a frozen coil, or something that needs professional attention.
How much does it typically cost to fix an AC water leak?
Simple drain clearing runs $75 to $250, while a condensate pump replacement lands between $200 and $500, and a drain pan replacement can run $250 to $1,200 or more depending on the repair.

